Quick Answer
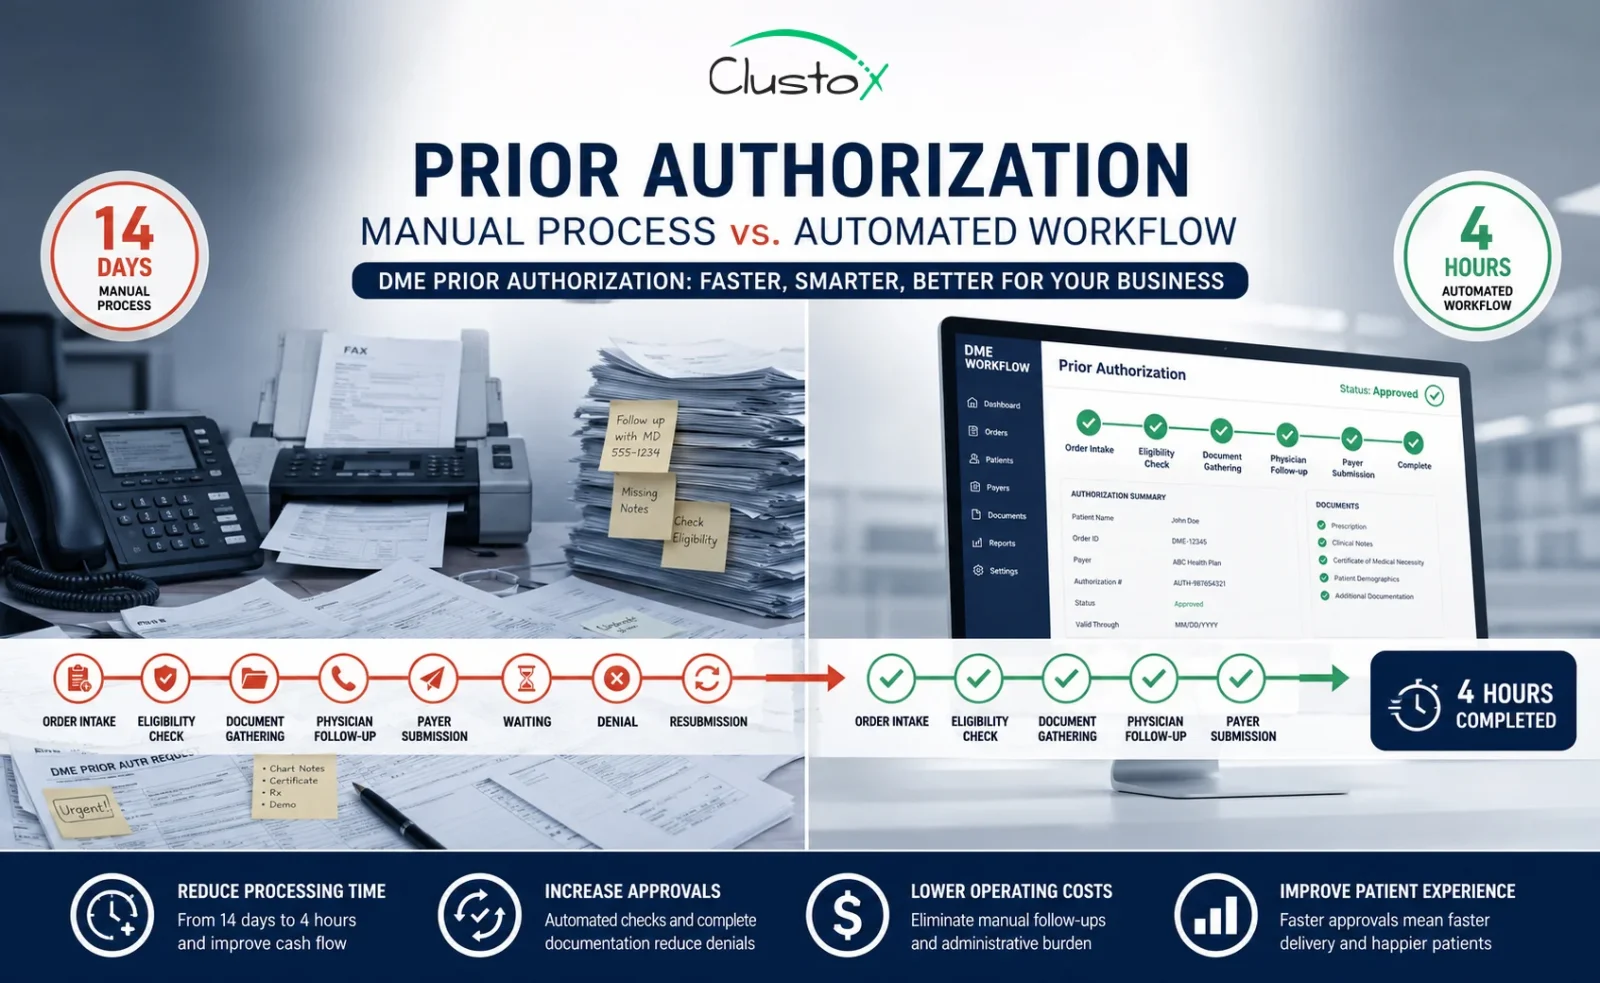
The prior authorization workflow for DME has eight core steps: order intake, eligibility verification, documentation collection, LMN confirmation, payer-specific requirement check, PAR submission, status tracking, and denial management. Manually, this process takes 7 to 14 days. With an optimized, automated workflow, the same steps complete in 4 to 8 hours.
Your billing team is not slow. The prior authorization workflow is broken.
At most DME suppliers, a single prior auth request bounces between intake coordinators, billing staff, referring physicians, and payer portals for days. Faxes sit in queues. Phone calls go to hold music. Follow-up tasks fall through the cracks. By the time approval arrives, you have already spent more staff hours on that one request than the reimbursement is worth.
The data backs this up. According to the American Medical Association’s 2024 Prior Authorization Physician Survey, physicians and their staff spend an average of 13 hours per week on prior authorization tasks. That is the equivalent of one and a half full business days, every week, per physician, just on authorizations.
This guide breaks down the prior authorization workflow step by step, shows you exactly where the delays happen, and gives you the operational fixes that bring a 14-day process down to 4 hours.
What Is a Prior Authorization Workflow for DME?
Before you can understand where time is being lost, you need a clear picture of what the prior authorization workflow actually is and what it is designed to do. Many DME billing teams treat it as a single task. It is not. It is a sequence of dependent steps, and a failure at any one of them stalls the entire process.
A prior authorization (PA) workflow is the sequence of steps a DME supplier follows to obtain payer approval before delivering equipment to a patient. It is a condition of payment, not a formality. If you skip it or submit it incorrectly, you do not get paid.
Table of Contents
For Medicare, the Prior Authorization Program for DMEPOS applies to items on the Required Prior Authorization List, which includes power mobility devices, Group 2 and Group 3 pressure-reducing support surfaces, and other frequently misused equipment categories. The full list is maintained at CMS.gov and is updated at least once per year.
For commercial and Medicaid payers, prior auth requirements vary by plan, by HCPCS code, and by geographic region. You cannot assume that what applies to Medicare applies to UnitedHealthcare or Humana. Each payer has its own submission portal, timelines, and documentation expectations.
The workflow starts at order intake and ends only when you have a written affirmative decision in hand. Every step between those two points is where time gets lost.
What Are the 8 Steps of the Prior Authorization Workflow?
The prior authorization workflow has a defined structure. Each step has a specific output that the next step depends on. Running these steps out of order, or skipping one to save time, consistently produces longer cycle times, not shorter ones.
Here is the full workflow in the sequence it should run.
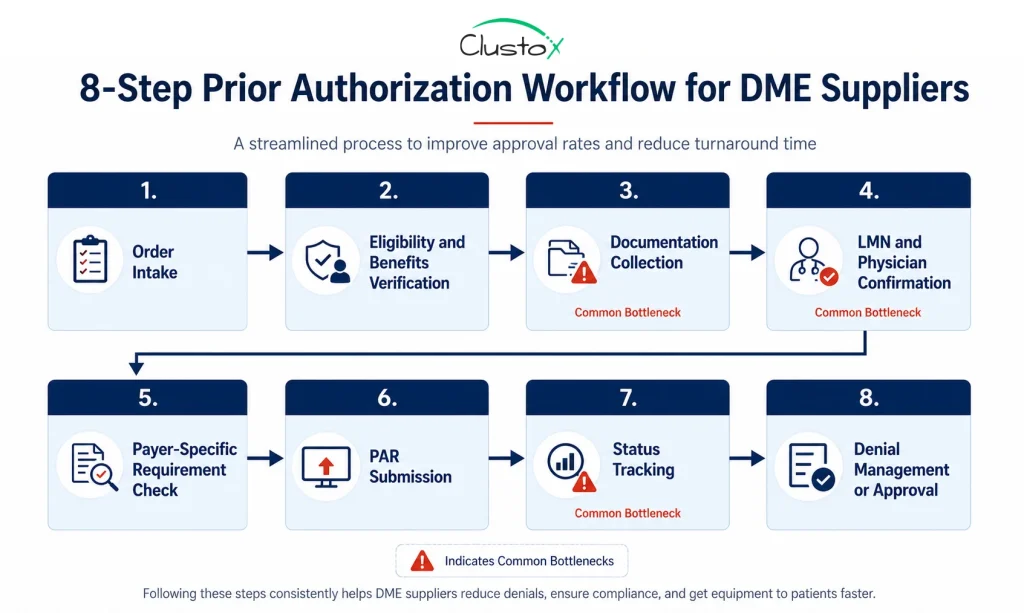
Step 1: Order Intake
Everything starts here, and everything downstream depends on the quality of your intake. The process begins when a referral or order arrives. Your intake team captures the patient’s demographic data, the ordering physician’s NPI, the HCPCS code for the requested equipment, and the date of the face-to-face examination. Missing any of these fields at intake means chasing them down later, which costs days.
Common intake platforms for DME include Brightree, NikoHealth, TIMS, and Universal Software Solutions. The more structured your intake form, the less rework your billing team handles downstream.
Step 2: Eligibility and Benefits Verification
You need to confirm three things before building a PA request: that the patient is actively covered, that the requested equipment is a covered benefit under the specific plan, and that prior authorization is required for that HCPCS code. Automated Insurance Verification can run this check before the PA file is built, so your team does not waste time on a submission that was never going to pay.
Step 3: Documentation Collection
This is the step that kills timelines. Documentation collection is where most of the 7-to-14-day manual cycle time accumulates. Healthcare Document Automation helps intake and billing teams extract required fields, match records to LCD criteria, and flag missing documents before the PA package reaches submission.
For a Medicare DMEPOS prior authorization request, the required documentation typically includes:
- A detailed written order (DWO) signed by the ordering physician.
- Records from the face-to-face examination (within the timeframe required by the applicable LCD).
- A letter of medical necessity (LMN) that addresses all coverage criteria in the applicable Local Coverage Determination.
- Proof of beneficiary eligibility
- Any supporting clinical notes, lab results, or prior treatment history required by the LCD.
CMS publishes a documentation checklist for DMEPOS prior authorization at CMS.gov. Use it as your baseline for every submission.
Step 4: LMN and Physician Confirmation
The Letter of Medical Necessity must specifically address the coverage criteria in the applicable LCD. A generic letter from the physician’s office will not pass review. Your team is responsible for confirming the LMN addresses every required element before submission, not after a non-affirmative decision comes back.
Getting a compliant LMN often requires going back to the referring physician, who may take several days to respond. This is the single biggest source of delay in most prior auth workflows. For equipment categories that still require certificate workflows, CMN automation can help validate physician details, HCPCS codes, signatures, dates, and medical necessity fields before the request is submitted. Sending a structured documentation request to the physician at the moment of intake, rather than waiting until documents are assembled, cuts this delay significantly.
Step 5: Payer-Specific Requirement Check
Once your documentation is assembled, verify the submission method, required forms, and any payer-specific coverage policies that go beyond the Medicare LCD. Commercial payers may require their own medical necessity questionnaires or a specific physician attestation form. Some have portal-only submission rules.
Maintain a payer matrix that documents these requirements for your top 10 to 15 payers. Review it quarterly. Payer requirements change without notice, and submitting the wrong form to the right payer produces the same result as submitting nothing.
Step 6: PAR Submission
For Medicare DMEPOS, the Prior Authorization Request (PAR) is submitted to the appropriate DME Medicare Administrative Contractor (MAC) based on your supplier’s jurisdiction. The four MAC jurisdictions for DME are administered by CGS Administrators and Noridian Healthcare Solutions.
Electronic prior authorization submission through the MAC portal is faster than fax and provides a confirmation receipt. Fax submissions create no real-time confirmation, which makes tracking open requests harder and introduces delays when submissions are lost or misdirected.
Step 7: Status Tracking
After submission, the MAC has a set timeframe to issue an affirmative or non-affirmative decision. Your team needs to track each open request against that deadline, follow up on requests that are pended due to missing documentation, and escalate anything that is approaching its decision window without a response.
Without a system to track status, requests get forgotten. Forgotten requests mean delayed equipment delivery, delayed billing, and patients waiting on equipment they need.
Step 8: Denial Management or Approval
A non-affirmative decision is not a dead end. You can resubmit with additional documentation or request a redetermination. The decision letter from the MAC must state the specific reason for the non-affirmative decision, which tells you exactly what was missing and what to fix.
If you receive an affirmative decision, the approval is tied to the specific beneficiary, HCPCS code, and supplier. Equipment can be delivered, and the claim can be submitted with the prior authorization number attached.
Where Do the Delays Actually Happen?
Most prior auth delays are not caused by slow payers. They are caused by internal workflow failures that add days before the request even reaches the MAC. Understanding where the time goes is the first step toward fixing it.
| Delay Source | Average Time Lost | Root Cause |
|---|---|---|
| Physician LMN follow-up | 3 to 5 days | No structured outreach process at intake |
| Incomplete documentation at submission | 2 to 4 days (resubmission cycle) | No pre-submission checklist |
| Manual status tracking | 1 to 2 days | No task management system |
| Wrong payer requirements applied | 2 to 3 days | Outdated payer matrix |
| Fax submission with no confirmation | 1 to 2 days | No electronic submission workflow |
The pattern is consistent across DME operations of every size: delays come from missing information, not from payer processing times. When your documentation is complete at submission, payer turnaround is much faster.
What Documentation Does CMS Require for DMEPOS Prior Authorization?
CMS documentation requirements for DMEPOS prior authorization are tied to the applicable Local Coverage Determination (LCD) for the requested item. There is no single universal list that covers every product category. Requirements vary by HCPCS code, and submitting a documentation package that does not match the applicable LCD is one of the leading causes of non-affirmative decisions.
That said, the core documentation package for most DMEPOS prior authorization requests includes the following elements.
| Document | What It Must Include |
|---|---|
| Detailed Written Order (DWO) | Patient name, beneficiary ID, ordering physician NPI, item HCPCS code, quantity, frequency, signature, and date |
| Face-to-Face Examination Records | Date of examination, clinical findings relevant to the medical necessity of the equipment, physician signature |
| Letter of Medical Necessity (LMN) | Patient diagnosis, functional limitations, how the equipment addresses those limitations, coverage criteria from the applicable LCD |
| Beneficiary Eligibility Confirmation | Active Medicare coverage, Part B enrollment, no conflicting coverage denials |
| Prior Authorization Request Coversheet | Completed coversheet for the appropriate DME MAC jurisdiction |
| Supporting Clinical Documentation | Lab results, therapy notes, specialist letters, or other records required by the specific LCD |
CMS also requires that the face-to-face examination occur within the timeframe specified in the applicable LCD. For power mobility devices, for example, the face-to-face must occur within six months before the written order. Submitting documentation outside that window results in a non-affirmative decision regardless of the clinical justification.
How Does the Exemption Process Affect Your Prior Authorization Workflow in 2026?
The CMS prior authorization exemption is the most significant operational development for compliant DME suppliers in several years. If your operation has maintained strong documentation standards, this change can materially reduce your PA overhead. If your error rates are high, it changes nothing.
What this means for your workflow:
- If you qualify, you bypass the PAR submission step for covered item categories within your exemption.
- You still need complete documentation; the exemption removes the pre-delivery review, not the documentation requirement.
- Exemption status is tracked by PTAN and jurisdiction, so a multi-location operation needs to qualify separately for each.
- CMS can withdraw the exemption if your affirmation rate drops below the threshold, with at least 60 days’ notice.
The exemption process rewards operational discipline. Suppliers with clean documentation practices and low non-affirmative rates can reduce their prior auth overhead significantly. Suppliers with high error rates remain in the full review cycle.
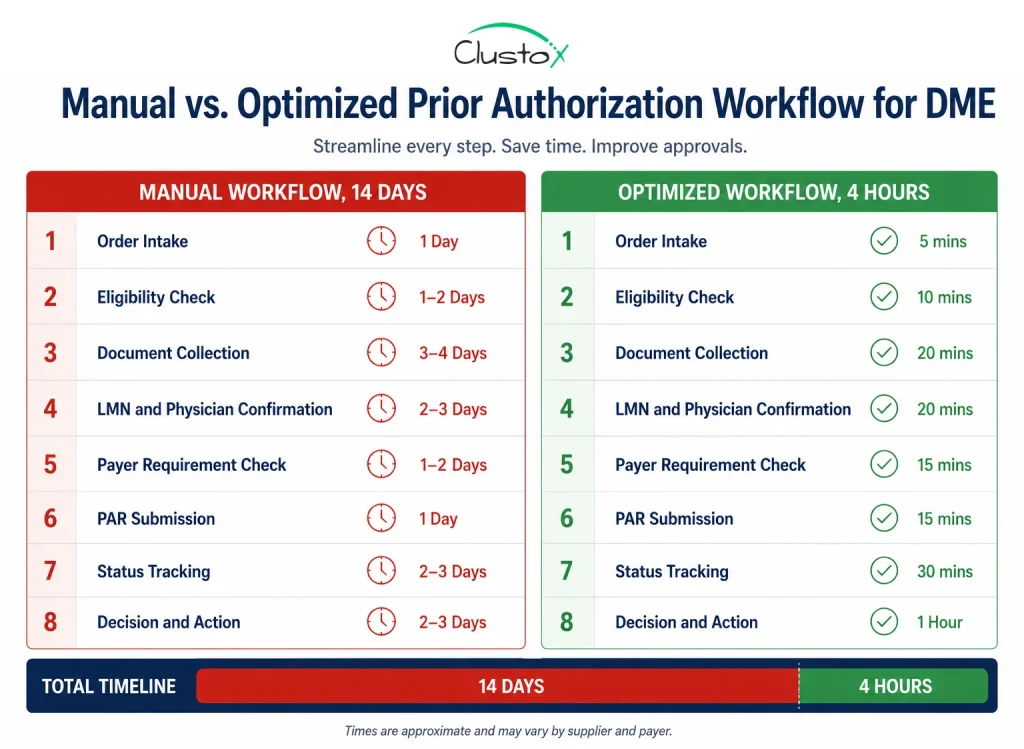
What Does an Optimized Prior Authorization Workflow Actually Look Like?
The gap between 14 days and 4 hours is not explained by technology alone. It is explained by process discipline. An optimized workflow does not require enterprise software or a large IT project. It requires structured handoffs, pre-built tools, and task ownership at every step. The table below shows what changes at each stage.
| Step | Manual Timeline | Optimized Timeline | Key Change |
|---|---|---|---|
| Order intake | 30 to 60 min | 5 to 10 min | Structured intake form with required fields enforced |
| Eligibility verification | 30 to 45 min (phone) | Under 5 min | Real-time 270/271 EDI via Brightree or NikoHealth |
| Documentation collection | 2 to 4 days | Same day | Pre-built LCD-specific checklist sent to physician at intake |
| LMN review and confirmation | 2 to 3 days | 2 to 4 hours | Physician communication template mirroring LCD criteria |
| Payer requirement check | 30 min | Under 5 min | Standing payer matrix reviewed quarterly |
| PAR submission | 30 to 60 min | 15 to 20 min | Portal submission with confirmation receipt saved |
| Status tracking | Ad hoc (often missed) | Automated alerts | Task management with deadline triggers |
| Decision receipt and action | 1 to 2 days | Same day | Portal monitoring with same-day response protocol |
The biggest gain comes from Step 3. If you send the physician a structured documentation request at the same time you capture the order, rather than days later, you eliminate the back-and-forth that accounts for most of your total cycle time.
The second biggest gain comes from Step 7. Manual status tracking fails because it depends on someone remembering to check. Automated task tracking with escalation triggers removes the human memory dependency entirely.
How Do You Reduce Prior Authorization Denial Rates in DME?
A denial does not just delay revenue. It triggers a resubmission cycle that costs staff time on top of the original submission cost. Most of those denials are preventable.
Following are the ways you can adopt to reduce denial rates:
| Denial Reason | Fix |
|---|---|
| Incomplete or missing documentation | Use a pre-submission checklist mapped to the applicable LCD for every request |
| LMN does not address coverage criteria | Provide the physician with a template that mirrors LCD language, not a generic form |
| Face-to-face exam outside the required window | Build a date-check step into intake; flag any order where the exam date falls outside the applicable timeframe |
| Wrong HCPCS code submitted | Use an internal HCPCS-to-coverage matrix verified against the current MAC LCD |
| Incorrect payer-specific forms used | Maintain a payer matrix; review quarterly and after any payer contract update |
| Submitted to wrong MAC jurisdiction | Confirm supplier PTAN jurisdiction before submission; DME MACs serve specific states |
When you receive a non-affirmative decision, read the denial letter in full on the day it arrives. CMS requires that decision letters state the specific reason for non-affirmation. That language tells you exactly what to address on resubmission.
Also track your denial reasons by category each month. If 40% of your denials cite the same documentation gap, that is a workflow problem requiring a process fix, not a one-off error requiring individual correction.
What Role Does Automation Play in the Prior Authorization Workflow?
Automation does not replace your billing team. It removes the work that should not require a human: eligibility checks, status tracking, documentation checklists, and payer portal submissions. The goal is not to automate judgment; it is to automate the high-volume, low-judgment tasks that consume most of your staff’s prior auth time.
Here is where automation produces measurable time savings in a DME prior auth workflow.
Real-time eligibility
Automated 270/271 EDI transactions replace manual phone calls, eliminating the 30 to 45 minutes per request that phone-based verification requires.
Documentation checklist generation
Systems that map HCPCS codes to the applicable LCD and generate a payer-specific checklist at order entry reduce documentation error rates and cut physician follow-up time.
Payer portal integration
Electronic PAR submission with confirmation receipt replaces fax and provides an auditable submission record.
Status monitoring
Automated task alerts tied to MAC decision deadlines replace the ad hoc manual follow-up that gets missed during busy periods.
Denial categorization
Automated tagging of denial reason codes feeds into monthly reporting that surfaces systemic documentation gaps.
Prior Authorization Workflow Checklist: What to Review at Each Stage
Use this checklist to audit your current workflow. Each item represents a step that, if skipped or done incorrectly, adds delay. If you cannot check every box in a given stage, that stage is where your cycle time is being lost.
Order Intake
- ☐ Patient demographic data captured completely at intake
- ☐ Ordering a physician’s NPI verified against NPPES
- ☐ HCPCS code confirmed against ordered item
- ☐ Date of face-to-face examination recorded and verified against LCD timeframe
- ☐ Prior auth requirement confirmed for this HCPCS code under this payer
Eligibility Verification
- ☐ Active Part B coverage confirmed
- ☐ HCPCS code confirmed as a covered benefit under the specific plan
- ☐ Prior auth requirement and submission method confirmed
- ☐ Patient cost-sharing and deductible status checked
Documentation Collection
- ☐ LCD-specific documentation checklist generated for this HCPCS code
- ☐ DWO received and verified for completeness
- ☐ LMN received and reviewed against LCD coverage criteria
- ☐ Face-to-face examination records received
- ☐ All supporting clinical documentation gathered
PAR Submission
- ☐ PAR coversheet completed for the correct MAC jurisdiction
- ☐ All documentation attached and organized per MAC submission guidelines
- ☐ Submission method confirmed (portal preferred over fax)
- ☐ Submission confirmation receipt saved to patient file
Status Tracking
- ☐ Open PARs logged in task management system
- ☐ Decision deadlines tracked with automated alerts
- ☐ Pended requests flagged within 24 hours of pend notification
- ☐ Escalation path defined for requests approaching their decision deadline
Denial Management
- ☐ Non-affirmative decision letter reviewed on the day of receipt
- ☐ Specific denial reason documented and categorized
- ☐ Resubmission or redetermination path decided within 48 hours
- ☐ Denial reason code added to monthly reporting for trend analysis
Conclusion
The prior authorization workflow comes down to eight steps, and every one of them is manageable. The problem lives in the gaps between steps, where tasks get dropped, documents go missing, and days disappear.
Most DME suppliers running a 14-day PA cycle are dealing with an intake problem, a documentation problem, and a tracking problem. Fix those three things and your cycle time drops fast.
Start with Step 3. Send the physician a structured documentation request the moment the order comes in. Build the checklist, set the task alerts, and move submissions off fax and onto the portal.
Automation handles the rest. Real-time eligibility checks, portal submissions, deadline alerts, and denial tracking all run without manual intervention. Your billing team stops chasing paperwork and focuses on work that actually requires judgment. Clean processes plus the right automation tools get you to the 4-hour workflow.
Frequently Asked Questions (FAQs)
What Happens if You Deliver Equipment Before Prior Authorization Is Approved?
For items on the CMS Required Prior Authorization List, an affirmative decision is a condition of payment. If you deliver before approval and the request is denied, Medicare will not pay the claim. There is no retroactive appeal path. Do not ship before you have the decision in writing.
Can You Resubmit a Denied Prior Authorization Request?
Yes. A non-affirmative decision is not final. You can resubmit with corrected documentation or request a redetermination. The decision letter must state the specific reason for denial, which tells you exactly what to fix.
What Is the Difference Between a Prior Authorization and a Pre-Claim Review?
Prior authorization must be obtained before the item is delivered. Pre-claim review can occur after delivery but before or alongside the claim. CMS uses both programs for DME under separate rules.
Why Do Most Prior Authorization Denials Happen?
Incomplete documentation is the leading cause. The most common specific failure is an LMN that does not address LCD coverage criteria. Other frequent reasons include exam dates outside the required window, incorrect HCPCS coding, and submission to the wrong MAC jurisdiction.
How Do You Track Open Prior Authorization Requests Efficiently?
Use a task management system with deadline-based alerts tied to MAC decision timeframes. Spreadsheets fail at volume. Brightree, NikoHealth, or any standalone tool works, provided every open PAR has an owner, a due date, and an escalation path.
Is Your Prior Authorization Workflow Costing You More Than It Should?
Clustox works with DME suppliers to map their current PA workflow, identify where cycle time is being lost, and build automated systems that bring approval timelines from 14 days to under a business day.
Disclaimer
This article is intended for DME providers, operations leaders, and billing directors. It is not medical advice and does not constitute guidance on patient care, equipment selection, or clinical decisions. Regulatory references (CMS, HIPAA, accreditation standards) are accurate as of the review date; regulations change frequently, and providers should consult primary sources or qualified counsel for current requirements.