
“Migrating code might seem as simple as clone-and-push, but one missed step can cost days of work.”
— An old carpenter’s rule fits software migration better than most coding quotes.
Migrating repositories from GitHub to Bitbucket is often described as “clone, push, done.” But in reality, a single mistake, like a missing commit, broken branch, or misconfigured hook, can disrupt builds, block deployments, and slow down your team.
Many organizations move to Bitbucket for tighter Jira integration, granular access controls, and cost efficiency. But the real challenge is transferring years of development history safely. With over 420 million repositories hosted on GitHub, even a minor oversight can erase valuable collaboration data that teams depend on daily.
That’s why preparation matters. Before moving a single line of code, you need to plan, verify, and test every step to ensure your new environment runs as smoothly as the old one.
In this blog, we will explore how to migrate Git repositories from GitHub to Bitbucket step by step, ensuring your entire codebase moves safely, completely, and with confidence.
Let’s start with the essentials you need before migrating!
What Should You Check Before Migrating from GitHub to Bitbucket?
Before you hit “import,” it’s worth pausing to make sure nothing slips through the cracks. A little preparation now can save hours of fixing broken branches, lost history, or misaligned permissions later.
Table of Contents
Think of this as your pre-flight inspection, a quick run-through that keeps your GitHub to Bitbucket migration safe and predictable.
To make your Git repository migration smooth and stress-free, tick off these essentials first:
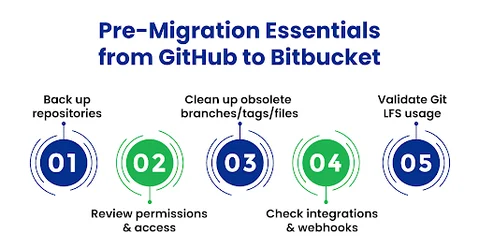
- Back up your repositories: Create a full local clone (including all branches, tags, and Git LFS objects) so you always have a safe copy if something goes wrong.
- Review permissions and access: Audit who currently has access in GitHub and map those permissions to Bitbucket to avoid gaps or oversharing later.
- Clean up your repo: Remove obsolete branches, stale tags, or large unused files. This reduces transfer time and prevents clutter in the new environment.
- Check integrations and hooks: List any webhooks, CI/CD pipelines, or third-party tools connected to your GitHub repo so you can reconnect or reconfigure them in Bitbucket.
- Validate Git LFS usage: If you’re using Git LFS, ensure Bitbucket supports your file sizes and bandwidth quotas, and plan the Git LFS migration to Bitbucket accordingly.
How Do You Migrate Your Repositories from GitHub to Bitbucket Step by Step?
Once your pre-migration checklist is complete, it’s time actually to move your repositories. Regardless of whether you’re transferring one project or hundreds, following a clear process reduces downtime and errors.
With the groundwork done, let’s move on to the step-by-step GitHub to Bitbucket migration so nothing slips through the cracks.
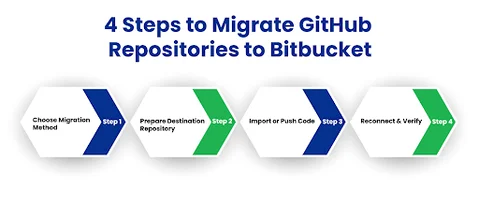
Step 1: Choose Your Migration Method
Now that you’re ready to start the move, the first decision is how you’ll migrate. The method you pick here sets the tone for the rest of the process, so it’s worth pausing for a moment.
You have two main paths:
1. Use Bitbucket’s built-in import tool
This is the quickest route if you’re migrating a single repository or a few small to medium-sized ones. Simply log in to Bitbucket, go to Create > Import repository, paste your GitHub URL, and the tool will handle the cloning for you. It automatically preserves branches and commit history.
2. Do a manual Git push
For very large repositories, Git LFS-heavy projects, or when you want more control, a manual push is safer. Clone your GitHub repository locally with
git clone --mirror https://github.com/yourname/yourrepo.git
Then, create a new repository in Bitbucket and push it with
git push --mirror https://bitbucket.org/yourteam/yourrepo.git
As you weigh these options, ask yourself: Do I need simplicity or control? Starting with a small test repository can help you decide before moving everything.
With your migration method chosen, you’re ready to prepare the destination repositories in Bitbucket, the next step in making the switch smooth.
Concerned about losing code, history, or disrupting your workflow during migration? Move your repositories safely to Bitbucket with zero downtime and full data preservation.
Step 2: Prepare Your Destination Repository in Bitbucket
With your migration method decided, the next step is to get Bitbucket ready to receive your code. Doing this upfront ensures you’re not scrambling to fix permissions or enable features after the move.
Set up Bitbucket before moving code to avoid scrambling later.
- Create target repositories: Go to Create > Repository, name each project clearly, and set it to private or public.
- Set permissions and access controls: Add users/teams from GitHub with matching permission levels (admin, write, read).
- Enable Git LFS if your project uses it.
- Replicate branch protection rules or workflows from GitHub to Bitbucket.
With your destination environment configured, you’re ready to actually move the code by cloning, pushing, or importing, depending on the method you chose in Step 1.
Step 3: Move Your Code to Bitbucket
Once your Bitbucket repositories are ready, it’s time to transfer your code. How you do this depends on the migration method you chose in Step 1.
Option 1: Using Bitbucket’s Import Tool
- Go to Bitbucket → Create → Import repository.
- Paste your GitHub repository URL.
- Select the workspace and project where you want the repository to reside.
- Click Import repository.
What happens: Bitbucket automatically clones all branches, commit history, and tags, making the transfer straightforward for small to medium repositories.
Option 2: Manual Git Push (Recommended for Large Repos or Git LFS Projects)
1. Clone your GitHub repository locally as a mirror:
git push --mirror https://bitbucket.org//.git
2. Push the mirrored repository to Bitbucket:
git push --mirror https://bitbucket.org/yourteam/yourrepo.git
This method preserves every branch, tag, and commit exactly as they existed in GitHub.
Important Tips During Transfer:
- Monitor for errors: Watch out for authentication issues, large file problems, or permission errors. Resolving them immediately is faster than troubleshooting later.
- Check Git LFS files: Make sure any large files have been uploaded correctly.
- Test with a small repository first: This helps ensure your process works before migrating multiple repositories.
- Document your steps: Keep notes on any adjustments or errors for future reference.
By following these steps carefully, your repository transfer will be complete and safe and preserve your full history, ready for the next step of reconnecting integrations and verifying workflows.
To avoid disruptions during large-scale repository transfers, the Cloud Migration Services support Git LFS handling, automated pushes, and validation across multiple repositories.
With the code now sitting in Bitbucket, your next task is to reconnect any integrations and verify that everything works the way it should.
Step 4: Reconnect Integrations and Verify Everything Works
With your code now living in Bitbucket, the job isn’t finished just yet. This is the moment to make sure all the pieces around your repository still function as expected.
Start by reconnecting integrations and pipelines. Any webhooks, CI/CD pipelines, or third-party services (such as Jira, Slack, or deployment tools) that were tied to GitHub won’t automatically follow you to Bitbucket. Go into each service, update URLs or credentials, and reauthorize where needed.
Next, run your builds and deployments to confirm the new connections work. This will quickly show if your pipelines, secrets, or credentials need adjusting.
Then, verify permissions and branch rules. Check that your teams still have the right level of access and that branch protection policies are active. This prevents accidental pushes or merges that could slip through during the transition.
Finally, compare commit history and tags between GitHub and Bitbucket to ensure nothing was lost. A quick diff or a visual comparison of branches can save hours of debugging later.
Once these checks are complete, your migration is truly done, and your team can continue working in Bitbucket with confidence.
Migrating from GitHub to Bitbucket isn’t just about moving code; it’s about keeping your workflows intact.
By following the checklist, choosing the right method, preparing Bitbucket, moving your code, and reconnecting integrations, you reduce risks and downtime.
Quick tips:
- Test on a small repo first.
- Document your steps for future moves.
- Let your team know about the switch.
That’s it! Your migration is done, and your team can start working in Bitbucket with confidence.
What Should You Do After Migrating to Bitbucket?
Moving your code is only half the job. Once the migration is complete, a little tuning makes sure your new Bitbucket environment runs smoothly and securely.
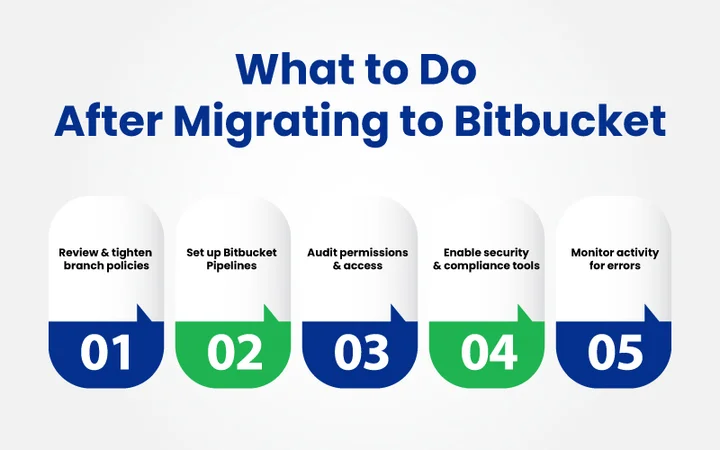
- Review and tighten branch policies: Reapply protection rules, require reviews, and merge checks so your workflows stay consistent.
- Set up Bitbucket Pipelines: Configure or reconnect your CI/CD pipelines to keep builds and deployments running without interruption.
- Audit permissions again: Double-check team and user access to avoid gaps or oversharing.
- Enable security and compliance tools: Turn on code scanning, secret detection, or other add-ons that match your security posture.
- Monitor activity for a few days: Watch logs and pipeline runs to catch any errors early.
These steps help stabilize your new GitHub to Bitbucket workflow so your team can focus on development instead of troubleshooting.
Migrating to Bitbucket is more than a code transfer; it’s a chance to improve how your team works. With your repositories moved, permissions aligned, and pipelines restored, you’ve laid the groundwork for smoother collaboration.
Keep monitoring and refining your setup, and your team can focus on building great software instead of fixing migration issues.
Wrap Up: Securing and Optimizing the Bitbucket Environment for Seamless Workflows
Migrating your repositories is only the first step; the real challenge is keeping every branch, tag, and pipeline running smoothly once you’ve switched platforms. Without a plan, teams often face broken integrations, inconsistent permissions, or bottlenecks that wipe out the time they hoped to save.
By reviewing branch policies, auditing access, reconnecting integrations, and enabling security tools right after the move, you turn a risky migration into a solid foundation for future development.
But what if you want to go beyond a one-time checklist? How do you make sure your new environment stays secure and efficient as your projects scale?
That’s where experienced DevOps Experts come in. From automating CI/CD pipelines to tightening access controls and monitoring performance, they help you transform a simple code transfer into a long-term productivity boost, so your team can focus on building great software instead of firefighting post-migration issues.
Frequently Asked Questions (FAQs)
2. What’s the Safest Way to Migrate Large Repositories or Those Using Git LFS?
For large repositories or ones with Git LFS objects, a manual git push --mirror is recommended. Bitbucket’s import tool works best for small to mid-sized repos, but manual migration gives more control over large file handling, authentication, and bandwidth limits.
3. Do I Need to Migrate CD/CD Pipelines and Webhooks Separately?
Yes. Pipelines, webhooks, and integrations (like Slack, Jira, or Jenkins) don’t automatically transfer during migration. You’ll need to reconnect them manually in Bitbucket and verify that credentials, secrets, and environment variables still work correctly.
4. How Can I Verify That My Migration Was Successful?
You can confirm a successful migration by:
- Comparing commit history between GitHub and Bitbucket.
- Checking that all branches and tags are present.
- Running a test build or deployment.
- Verifying user permissions and branch rules.
- Ensuring Git LFS files are accessible.
5. What Should I Do Immediately After the Migration?
Once the migration is complete, review and reapply branch protection rules, reconnect integrations, audit permissions, and enable Bitbucket security tools. Monitor activity for a few days to ensure everything runs smoothly before fully retiring your GitHub repositories.
Worried about delays or errors after migration? Cut mistakes by 50% and speed up deployments by 40% with an optimized Bitbucket setup.