It can be difficult to manage several Node.js versions in the JavaScript development community. To maintain compatibility across multiple projects, developers frequently have to switch between versions. The development process may be hampered by this difficulty, which may result in contradictions and possible disputes.
Node Version Manager (NVM) offers a solution to this problem. NVM guarantees that every project runs with the necessary Node.js version, ensuring consistency and minimizing conflicts by enabling developers to easily install, manage, and switch between multiple Node.js versions.
In fact, approximately 52% of Node.js users utilize NVM to manage their Node.js versions efficiently. However, setting a default Node.js version is crucial for maintaining uniformity across development environments. Without a default version, developers may unknowingly work with unintended Node.js versions, resulting in unexpected behaviors and bugs.
In this blog, we will explore how to set a default Node.js version using NVM, ensuring a consistent and efficient development workflow.
What Is Node Version Manager (NVM)?
Node Version Manager (NVM) is a command-line tool that allows developers to install, manage, and switch between different versions of Node.js with ease. Instead of being limited to a single Node.js installation on your system, NVM lets you run multiple versions side by side, making it easier to handle projects with different requirements.
This flexibility is particularly useful for teams and individual Node.js developers working across projects that depend on specific Node.js releases. By using NVM, you no longer have to worry about conflicts or manually reinstalling Node.js each time you switch projects.
Key Features of NVM include
- Install multiple versions of Node.js on the same system.
- Easily switch between Node.js versions for different projects.
- Set a default Node.js version to avoid unexpected conflicts.
- Test your applications against different Node.js versions without complex setups.
- Works across major platforms (macOS, Linux, and Windows via WSL).
Struggling To Manage Multiple Node.js Versions Across Projects? No more version conflicts! With NVM, you can switch and set defaults in seconds.
Table of Contents
How to Set the Default Node.js Version in NVM?
When you work on multiple Node.js projects, each may require a different version. Manually switching versions every time can be frustrating and error-prone. That’s where NVM makes things easier by allowing you to set a default Node.js version.
With a default configuration, every new terminal session will automatically use the version you prefer, keeping your development workflow consistent and avoiding compatibility issues.
Now, let’s look at the practical steps for setting, verifying, and switching the default Node.js version with NVM.
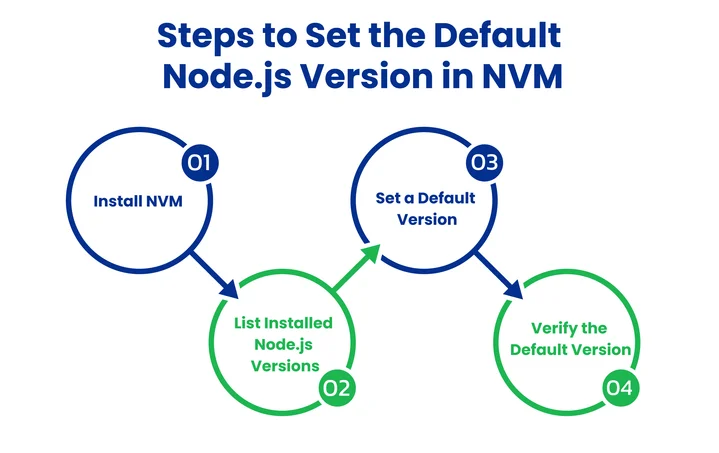
1. Setting A Default Node.js Version
Once you have NVM installed and at least one version of Node.js set up, you can define which version should be used by default. This means that whenever you open a new terminal session, Node.js will automatically load that version without requiring you to manually switch each time.
To make a version the default across all future terminal sessions, use:
nvm alias default <version>
To do this, NVM provides the nvm alias default command. You simply replace with the version number you want to set.
Example:
If you want Node.js 18 to be the default, run:
nvm alias default 18
From this point on, every new terminal session will automatically use Node.js 18 unless you choose to switch. This is especially helpful when most of your projects depend on the same version, saving time and avoiding errors caused by mismatched versions.
2. Verifying The Default Version
After setting a default Node.js version in NVM, the next step is to verify that your system is actually using the correct version. This is important because if your terminal session doesn’t pick up the default properly, you could end up running a project with an unintended Node.js version. That often leads to errors, dependency mismatches, or even failed builds.
The easiest way to check the active Node.js version is by running the following command:
node -v
This will display the current version of Node.js being used in your terminal.
For Example:
If you previously set Node.js 18 as the default using nvm alias default 18, the output should look something like this: v18.19.0
You can also double-check NVM’s current settings by listing all installed versions:
nvm ls
Here, the default version will be marked with an arrow (->) and the alias default. For example:
-> v18.19.0
v20.11.1
default -> 18 (-> v18.19.0)
If the output matches the version you set as default, then your configuration is correct. However, if it shows a different version, you may need to:
- Restart your terminal so NVM can reload.
- Ensure your shell configuration file (.bashrc, .zshrc, or .profile) has the correct NVM setup lines.
- Re-run the
nvm alias default <version>command to reset the default.
By verifying the version right after setting it, you can be confident that all your projects will run on the intended Node.js release without surprises.
3. Switching Node.js Versions
Even after setting a default Node.js version, there are times when you’ll need to switch between versions. This usually happens if you’re working on multiple projects. One may require the latest LTS (Long-Term Support) release, while another might depend on an older version for compatibility.
Instead of reinstalling Node.js manually, NVM makes it easy to move between versions in just one command. To switch versions temporarily in your current terminal session, use:
nvm use <version>
Let’s see this example:
nvm use 20
This will activate Node.js 20 for that session only. Once you close the terminal and open a new one, NVM will revert to the default version you set earlier.
If you’d like to quickly switch to the latest LTS release, you can run:
nvm use --lts
Additionally, to see which versions are already installed on your machine, you can check with:
nvm ls
This gives you a clear view of all installed versions and makes it easy to decide which one to activate.
Switching versions with NVM is especially useful in team environments, CI/CD pipelines, and legacy code maintenance, where different Node.js releases are still in active use. It saves time, avoids conflicts, and keeps projects running smoothly without manual setup.
Why Setting a Default Node.js Version Matters?
When working across multiple projects, it’s common to switch between different Node.js versions. Without a default version in place, developers often end up running code on the wrong version, which can lead to unnecessary errors and wasted time.
Setting a default version with NVM eliminates these headaches and ensures every new terminal session starts with the right environment.
That default brings several important benefits:
1. Consistency Across Projects
A default version helps maintain uniformity, so whether you’re starting a new project or revisiting an old one, you always know which Node.js version will load. This consistency reduces confusion and keeps teams aligned.
2. Avoiding Unexpected Bugs
Many issues in Node.js applications stem from subtle differences between versions. By setting a default, you minimize the risk of running into version-related errors that could otherwise go unnoticed until later in the development cycle.
3. Smoother Onboarding for Teams
When new developers join a project, having a defined default version ensures they can get started quickly without worrying about setup mismatches. It creates a stable, predictable environment that speeds up onboarding and reduces setup friction.
Conclusion
Setting a default Node.js version with NVM might seem like a small configuration, but it has a big impact on everyday development. It helps avoid unexpected bugs, keeps projects running on the intended version, and saves time that would otherwise be spent troubleshooting version mismatches.
Simple commands like "nvm alias default," "node -v," and "nvm use" can be used to establish a consistent environment that facilitates workflows for both individuals and teams. With a stable backend setup in place, you can focus more on building and improving your applications.
And if you’re also considering which frontend technologies to use alongside Node.js, exploring resources such as different frontend frameworks can help you align your stack from end to end.
Together, managing Node.js versions effectively and choosing the right frontend tools lay the groundwork for reliable, scalable, and efficient development.
Frequently Asked Questions (FAQs)
2. Can I Set Different Default Node.js Versions for Different Projects?
Yes, you can. While nvm alias default sets a global default for your system, you can also create a .nvmrc file inside a project’s root folder and specify the required version (e.g., 18). Then, whenever you run nvm use inside that project directory, NVM will automatically switch to the version defined in .nvmrc.
3. What Should I Do If My Terminal Isn’t Loading the Default Node.js Version Correctly?
If your default Node.js version isn’t applied automatically:
- Make sure NVM is properly added to your shell configuration file (.bashrc, .zshrc, or .profile).
- Run
nvm lsto check the active version. - Try restarting your terminal.
- Re-run
nvm alias default <version>to reset the default.
These steps usually fix most configuration issues.
Looking for Professional Node.js Development Services? Let our Experienced developers handle it for you!